3D Architectural Visualisation
Master the art of 3D architectural visualization to create stunning, photorealistic renderings that bring your designs to life. Learn to utilize professional tools to showcase interior and exterior projects with impeccable detail, lighting, and textures.
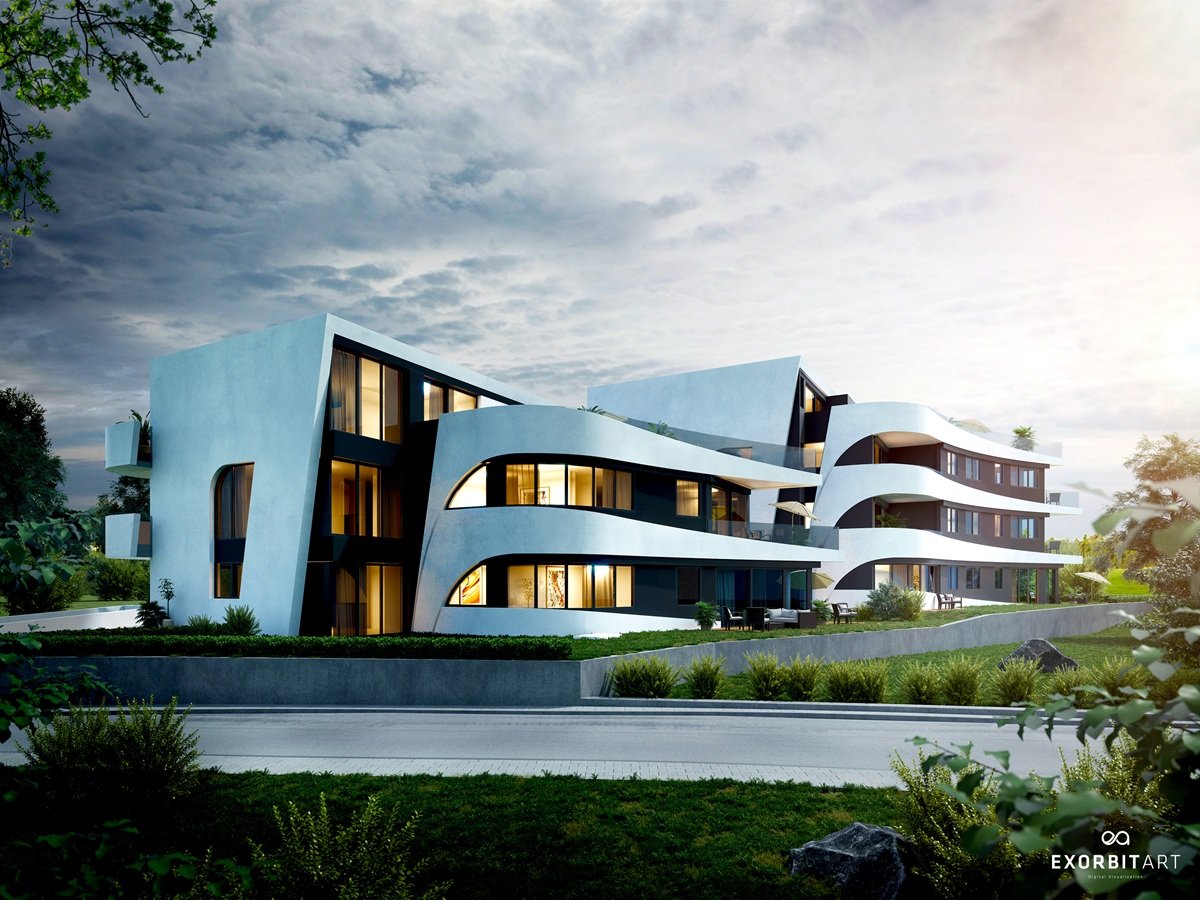
Construct your first 3D architectural model in our intensive 4-week course
Designed for aspiring architectural visualisers, this comprehensive four-week course on Seed LMS guides you step-by-step through Autodesk Revit and modern AI workflows. You will develop the essential skills of BIM modelling, core shell construction, architectural detailing, custom material application, and lighting while building a professional visualisation pipeline. Beyond the core four weeks, you’ll receive a full month of free, one-on-one mentorship to polish your final renders, troubleshoot your model in real-time, and confidently build your architectural portfolio. Choose from our curated pool of 10 exciting architectural briefs, refine your skills, and graduate with high-quality, portfolio-ready still renders.
Course Outline
Week 1: The BIM Foundation – Interface & Core Shell
Topic A: The Revit Ecosystem & UI
- Introduction to Building Information Modelling (BIM) vs traditional CAD.
- Interface Tour: Project Browser, Properties Palette, Ribbon, and Quick Access Toolbar.
- Starting a Project: Units, Levels, and Grids (The skeletal framework).
Topic B: Modelling the Shell (Walls & Floors)
- Wall Types: Exterior vs interior partitions.
- Modifying Walls: Heights, constraints, and profile editing.
- Floor Systems: Creating structural and finish floors using sketch mode.
Topic C: Openings & Circulation
- Placing Doors and Windows: Using families and adjusting parameters.
- Stair and Ramp Basics: Connecting levels accurately.
Week 2: Architectural Details – Roofs, Ceilings & Components
Topic A: Roof Systems
- Roof by Footprint vs Roof by Extrusion.
- Defining slopes, overhangs, and soffits.
- Attaching walls to the roof.
Topic B: Ceiling & Lighting Setup
- Automatic Ceilings vs Sketch Ceilings.
- Placing Ceiling Components: Lighting fixtures and AC vents.
Topic C: Component Families & Interiority
- Loading Furniture and Fixture Families.
- Component Placement: Proper alignment and rotation.
- Creating “Groups” for repeating apartment or office layouts.
Week 3: Lookdev – Materials, Site & Still Rendering
Topic A: Material Browser & Custom Textures
- Applying Materials: Concrete, Wood, Glass, and Masonry.
- Identity, Graphics, and Appearance tabs.
- Creating custom materials using high-res image maps.
Topic B: Site & Topography
- Toposolid/Toposurface: Creating terrain from site plans.
- Site Components: Adding trees, shrubs, and parking.
- Property Lines and Building Pads.
Topic C: Cameras & Still Renders
- Setting up Perspective Cameras (Eye-level vs Bird’s eye).
- Sun Settings: Geographic location and time of day (Solar studies).
- Rendering Settings: Draft vs High Quality. Outputting PNG/JPG files.
Week 4: AI Workflow, Documentation & Final Sprint
Topic A: Innovative AI Workflow (Using Gemini)
- The AI Design Consultant: Using Gemini to brainstorm material palettes or interior styles.
- Prompt Example: “Suggest a modern Scandinavian material palette for a coastal villa using Revit-standard materials.”
- Technical Troubleshooting: Pasting Revit error messages or workflow hurdles into Gemini for instant peer-level advice.
- The Content Creator: Using Gemini to write professional project descriptions for your portfolio.
Topic B: Scheduling & Basic Sheets
- Generating Room Schedules and Door/Window tags.
- Setting up Sheets: Placing views, renders, and site plans on a title block.
Topic C: Exporting for Animation
- Preparing the 3D view for Twinmotion.
- Cleaning the model: Turning off unnecessary categories for a faster export.
Mentorship & Portfolio Polish
Mentorship & Portfolio Polish
After four weeks of core instruction, students enter a free 1-month mentorship delivered online via Discord. This phase shifts the focus from learning new tools to applying them to industry standards.
- Project Polish & Portfolio Building: Finish or redo your 2 required projects. High-quality submissions ensure better scores and a stronger portfolio.
- Weekly 1-on-1 Sessions: Each student is assigned a dedicated mentor for a personalised 30 to 60-minute weekly guidance session.
- Open File Reviews: Present open project files via live screen sharing for direct mentor critiques and feedback.
- Live Debugging: Join dedicated livestreams where instructors actively troubleshoot settings and fix your project errors in real-time.
- Final Premiere: Submit your fully rendered images or video for the Virtual Viewing Party to watch and critique final reels with the class.
- Certification & Next Steps: Complete the course evaluation and submit all final polished projects to finalise grading and unlock your Certificate of Completion.
